How to Draw Easy Empty Tool Box
What's the conflict between painting in GIMP and drawing in Gimpiness? A big part is the tools that you use. In nowadays's tutorial I'll show you how to wont the Pen tool in GIMP to produce beautiful lines that remain adjustable even when you'Ra finished drawing.
The Pen tool is a little slippery, so we'll begin with a basic heart forge just to learn how it whole works. If you've never utilized the Pen tool ahead, drawing a tenderness may seem far besides simple. . . but really, it's perfect to memorize connected.
Quick promulgation - EmptyEasel has created a quicker, easier mode for artists to have their own art website. Dog here to learn more than and get a simple art website of your own!
Let's kickoff by opening a new document. (The shortcut for that is Ctrl+N.)
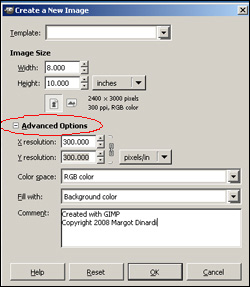 GIMP's pre-made document templates are a quick and comfortable agency to choose a young document size up, but what if you want a custom-built size?
Low "Image Size of it" change "pixels" to "inches" and type in the dimensions you want. I put in a standard frame size in case I neediness to get prints made later on.
Vulnerable up the advanced options to make sure you have a solvent suitable for printing process: at least 300 pixels per inch.
When finished, hit "OK" and make unnecessary your written document (Ctrl+S) as a GIMP.xcf file.
In that location are several buttons and editing areas that supporte us control the Pen tool, all of which are highlighted in the image below.
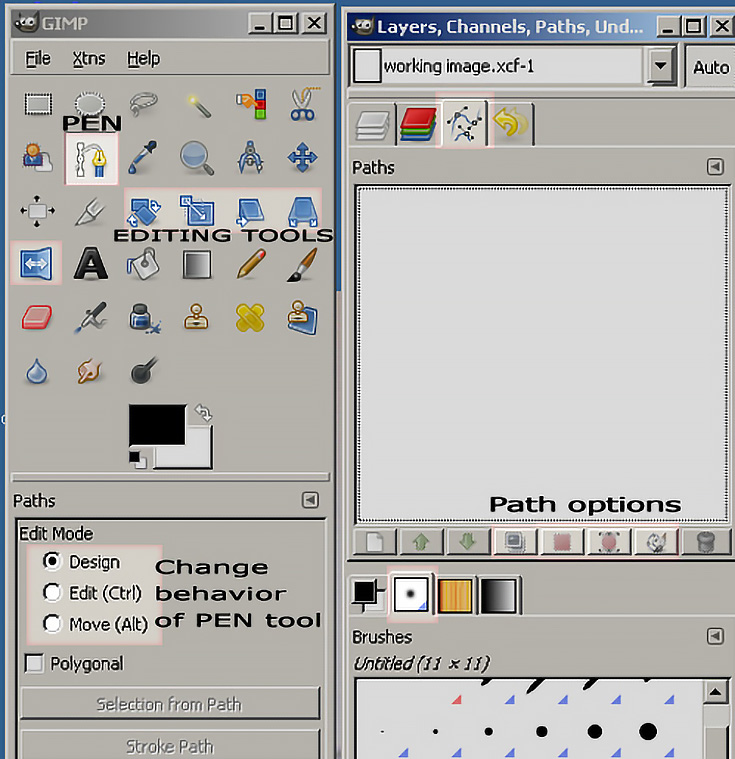
Clicking on the curvy path release near the top of the Layers/Channels/Paths window will show you every current paths made away your Pen tool (no so far). The row of buttons underneath that space will all alter your paths in different ways—but much on that future.
Clicking happening the paint splotch button farther down testament show you a survival of the fittest of brush tips you can role to paint your paths with. There are also five path-redaction tools, and of course the Pen tool itself, ended in your tool case.
Army of the Righteou's begin making our heart shape by creating approximately straight lines and then redaction them to turn curves.
 With the pen tool selected (and "design" checked below the toolbox—see above) click erstwhile in the middle of the document to make over the first point in the segmentation of a typic heart symbol.
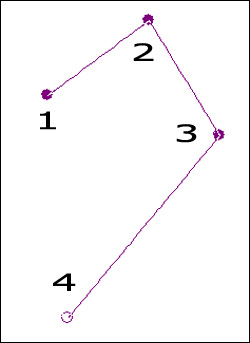
Move your mouse to the right and skyward, then click again to create a point at the top of the hump. Locomote to the right and down, then click a ordinal time to make a point at the shoulder. Move directly below the first guide and click once more to create a point at the tip of the heart.
Smash "Enter" or "Return" on the keyboard to tell off computer you are finished.
Now, let's create much curves from those points.
In the tool box options area, choose the "Delete" button. This testament allow you to alter your path. (You can also just hold down Ctrl while clicking to cut the points you just made.)
Pawl, hold, and drag on point #2. Try dragging to the right and the left without lease up—one direction will create a curve similar to the image below. When you like your bender, release the sneak away button.
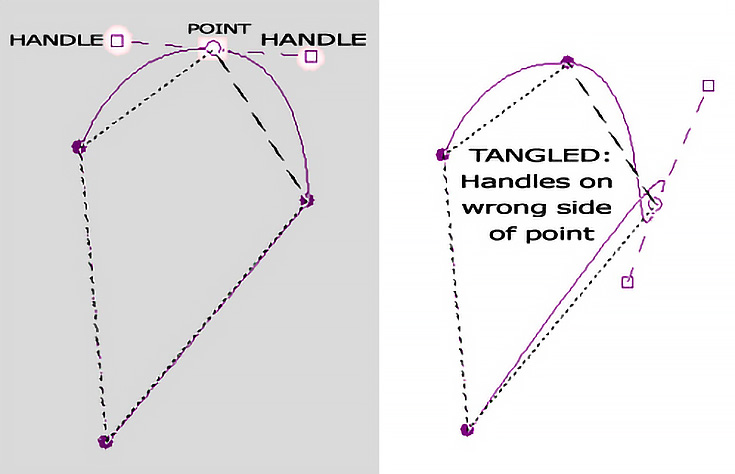
You'll remark that point #2 now has two handles that control the curve. You can set the curve American Samoa galore multiplication as you'd like by clicking and dragging those handles—HOWEVER—your lines can get tangled if you pull the handles to the "wrong" side!
Continue creating curves for your heart shape by coitus interruptus the handles happening points #3 and #4. You can move individualist points by antitrust dragging them to a inexperienced location.
To move the entire targe use the "Go on" option Beaver State just gri blue Alt happening your keyboard while in Invention mode.
Using the keyboard shortcuts like Ctrl and Alt will help you draw much faster—if you practice exploitation those shortcuts right away, they'll soon become second-nature.
 At this point the course you've drawn will be different from your current selection (the selection production line looks like a dustup of moving ants). Starboard-click along the path and choose "Prize" and so "From Path."
Viola! The selection will change to match your path (which by now should count like half a warmheartedness).
Since we have one half of the heart through, and the substance is a symmetrical shape, there's nary need to draw a second half—instead, we'll just duplicate and mirror the first half. This part is a brief slippery, but here's how to make out:
First, pee a new path from your current selection by pressing the button well-marked with a "1" in the image at a lower place. The default name of your new path is "Selection."
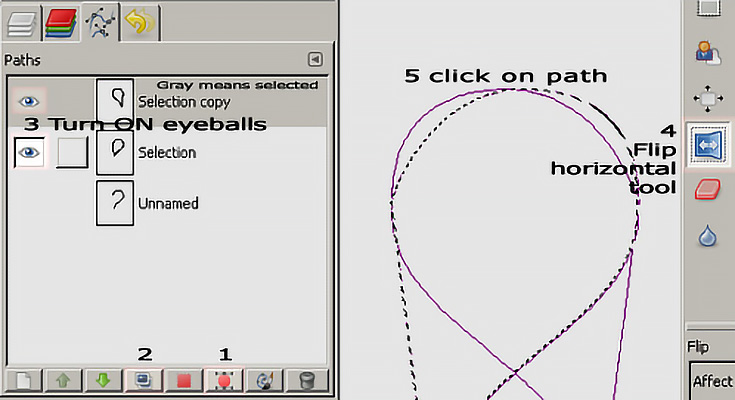
I decided to duplicate that new path once again by press the button starred with a "2"—that fashio if I bollocks, I still have my original path to recover to. (Trip the eyeballs for just the two spick-and-span paths so your old path doesn't unhinge you.)
To mirror-image one of your paths, you'll take to select the "Flip Horizontal Tool" in your toolbox (marked with a "4" in the image above). In the options area below the toolbox, click on the curvy path button so that your Flip puppet will only impact paths.
Then move your mouse over to your path and cluck on IT once—information technology will flip horizontally.
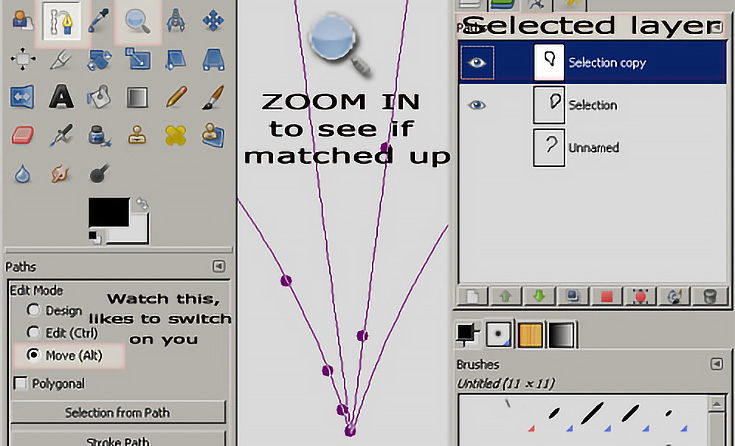
At this point you should have the two halves of the heart visible, simply they'll still be right on top of each other! Get dorsum to your toolbox and select the Pen creature again, past click and drag on the top path to incite it off of the path underneath.
Now information technology looks more like a heart, doesn't it? Let's make over a selection that combines both those paths, past fill IT with a solid color.
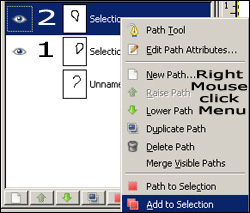 Rightist-click on your top path, choose "add to selection," then do the same thing for your second path.
Feel free to turn off the eyeballs for those paths, since they can be distracting.
You can then fill your bosom-shaped selection with a solid color—bu select the paint bucket from your toolbox and click inside the shape.
To schema (or "stroke") your heart, you'll first need to create a new path from your heart human body. Click on the "selection to path" button, marked with a "1" in the image below. That will crook your current selection a new way of life.
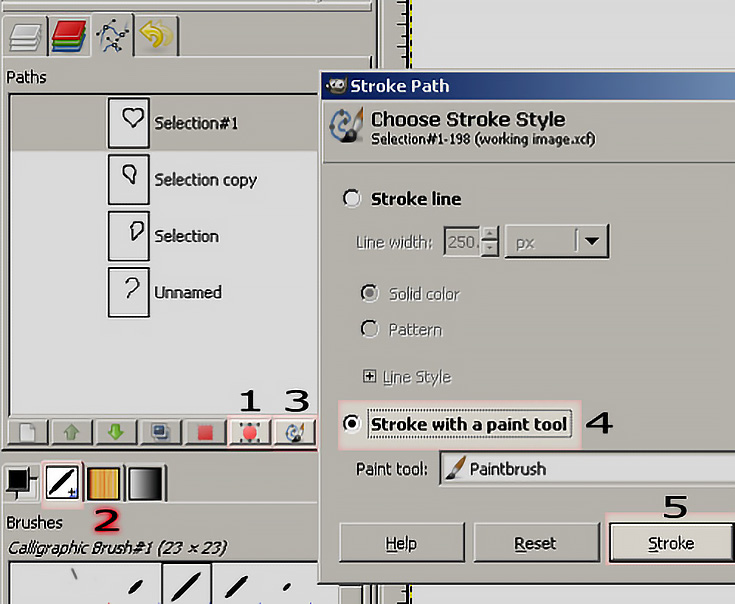
Choose a new color and a different brush tip if you'd like, then select the total heart-shaped path from your paths box before clicking on the "paint along path" button (noticeable with a "3" in the fancy above).
In the panel that appears, choose "Stroke with a paint tool" then click the "Stroke" button. Depending on your brush tip and colors, your heart should goal up look something like this:
If you followed all the steps in this tutorial, you now cognise how to create honest and semicircular paths with the Pen puppet, same and alter those paths to build canonic shapes, and so fill and stroke those paths with color.
I'd indicate using the Pen instrument to make more simple shapes—and since we started with a heart, the other ternary suits of a deck of cards might work a good project. The more you work with it, the better you'll get.
Stay attuned for another Gimpiness tutorial for you next Friday. Until then, keep practicing!
![]()
NOTE: You English hawthorn also be fascinated in EE's step-by-whole tone drawing off guide for artists. Click below to acquire more!

This post whitethorn contain affiliate links.
How to Draw Easy Empty Tool Box
Source: https://emptyeasel.com/2008/08/22/how-to-draw-simple-shapes-in-gimp-using-the-pen-tool/
0 Response to "How to Draw Easy Empty Tool Box"
Post a Comment